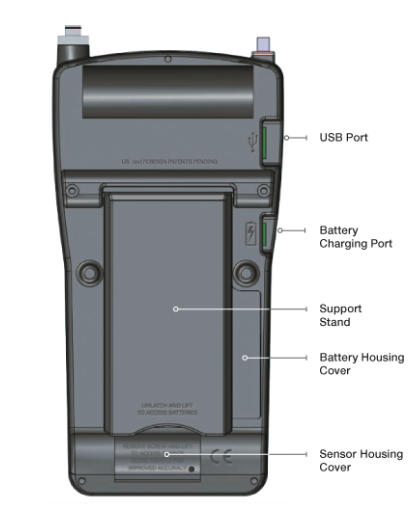
To View Log:
1. Press the “Menu” button and use the “RIGHT” → arrow button until “SETUP: VIEW LOG” is displaying
2. Press the “ENTER” button to select the “LOG” viewer
3. Use the “RIGHT” → and “LEFT” ← arrow buttons to navigate through the log. The screen will display up to a total of 50 data points
4. Press “Enter” to save settings and exit
To Clear Log:
1. Press the “MENU” button and use the “RIGHT” → arrow button until “SETUP: ERASE LOG” is displaying
2. Press the “ENTER” button to begin erasing all data points in the log
3. Once the screen displays “DONE”, all the data points have been erased from the log
4. Press “Enter” to save settings and exit
Calibrating the PRO OX-100:
Self-Calibrating Model:
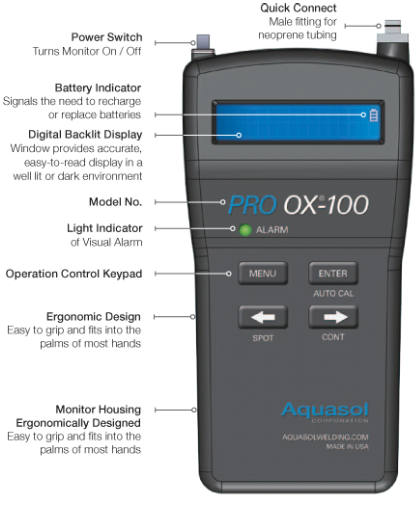
1. When the PRO OX-100 unit is at the main screen, the operator can press the “AUTO CAL” button to begin calibration
2. The unit will automatically begin to sample ambient air and automatically calibrate
3. Once the calibration is complete, the unit will display “CALIBRATION DONE”, and immediately return to the main screen
4. The unit is now ready to use
2-Point Calibration Model:
1. All Pro OX-100 Oxygen Monitors are factory calibrated and certified
2. 2-Point calibration procedure is required only when the sensor is replaced
3. Involves 2 steps using high point, “CAL HI”, and low point, “CAL LO”
4. “CAL HI” samples ambient air with the goal being 20.9% oxygen
5. “CAL LO” uses 99.999% argon with the goal being >100 ppm oxygen
6. Each point in the calibration process take approximately 14 minutes to finish
7. Press the “MENU” button and use “RIGHT” arrow button until “SETUP: CAL HI” is displayed
8. Press “ENTER” to confirm and again to being calibration
9. The pump will shut off automatically upon completion. Restart the monitor to exit
10. Insert the sample probe in an argon line with flow rate set at 20 CFH
11. Press the “MENU” button and use the “RIGHT” arrow button until “SETUP: CAL LO” is displayed
12. Press “ENTER” to confirm and again to begin calibration
Spot Reading Mode:
1. When the PRO OX-100 unit is at the main screen, press the “SPOT” button, and the unit will then begin running
2. Once the spot reading is complete, the PRO OX-100 will display the oxygen percentage value
3. Press the “LEFT” ← arrow button to return to main screen
Continuous Reading Mode:
1. When the PRO OX-100 unit is at the main screen, press the “CONT” button
2. During operation, the unit will constantly update the latest oxygen level
3. To exit out of continuous mode, press the “CONT” button, after the screen displays a reading


")
 — Battery Installation")
 — Setting the Alarm")
 — Setting the Language")
 — Setting the Time and Date")
 — Spot and Continuous Mode")
 — View and Erase Log")